If you’ve ever dreamed of smoking the perfect brisket right in your backyard, then this Camp Chef brisket recipe is exactly what you need. Whether you’re a beginner or a seasoned griller, you’ll discover simple steps to create tender, juicy, and flavorful brisket that rivals any Texas smokehouse.
Imagine slicing into a smoky, melt-in-your-mouth brisket with a crispy bark that will impress your family and friends. Ready to master the art of brisket smoking on your Camp Chef pellet grill? Keep reading, and you’ll unlock all the secrets to achieving barbecue perfection every time.
Ingredients
The right ingredients make all the difference in a Camp Chef brisket recipe. Choosing quality components ensures a tender, flavorful result. Each element has a role in developing the perfect brisket taste.
Brisket Selection
Pick a whole packer brisket with both the flat and point cuts. Look for good marbling to keep the meat juicy. A brisket weighing 10 to 14 pounds works well for smoking on a Camp Chef grill. Freshness matters; avoid frozen meat for better texture.
Dry Rub Components
Create a simple dry rub with salt, black pepper, garlic powder, and onion powder. Add smoked paprika for a mild smoky flavor. Brown sugar helps balance spices with a touch of sweetness. These basic spices highlight the meat’s natural flavors without overpowering them.
Wrapping Liquids
Wrapping the brisket during cooking locks in moisture and tenderizes the meat. Use beef broth or apple juice as wrapping liquids to add subtle flavor. Tallow is another option, providing richness and helping the meat braise inside the foil. These liquids prevent dryness during the long cooking process.
Preparing The Brisket
Preparing the brisket sets the stage for a tender, flavorful result. This step requires care and attention. Each part of preparation helps bring out the best taste and texture. Follow these simple actions to ready your brisket for the Camp Chef cooker.
Trimming Tips
Start by trimming excess fat from the brisket. Leave about a quarter-inch layer to keep the meat moist. Remove any thick, hard fat that won’t melt during cooking. Trim silver skin and any loose pieces for even cooking. Use a sharp knife and work carefully for best results.
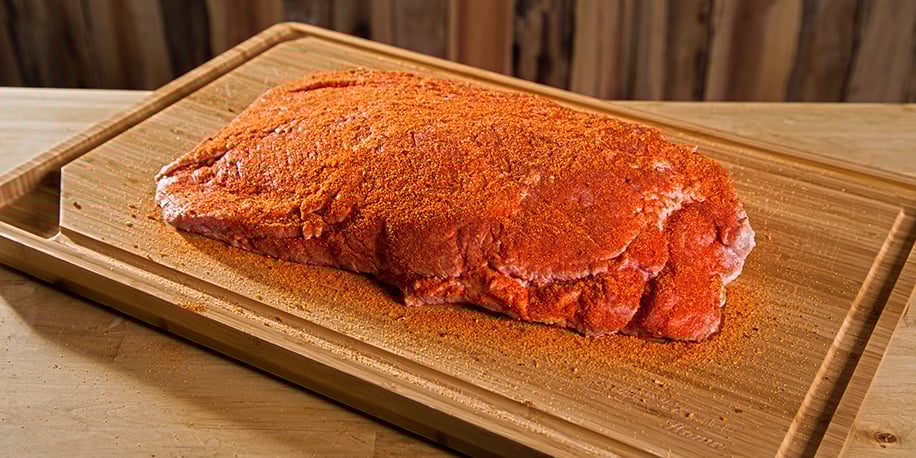
Applying The Rub
Pat the brisket dry with paper towels before seasoning. Apply a thin, even layer of your rub over the entire surface. Press the rub gently into the meat to help it stick. Use a mix of salt, pepper, garlic powder, and smoked paprika for classic flavor. Let the rub sit on the meat to absorb spices.
Resting Before Cooking
After seasoning, let the brisket rest at room temperature. Rest for 30 to 60 minutes before cooking. This helps the meat absorb the rub and promotes even cooking. Cover the brisket loosely to prevent drying out. Resting also brings the meat closer to cooking temperature.
Setting Up The Camp Chef
Setting up the Camp Chef correctly is key to cooking a perfect brisket. This step ensures even heat and smoke flow. It helps the meat cook slowly and absorb rich flavors. Preparing your grill right sets the stage for a tender, juicy brisket that melts in your mouth.
Follow each step carefully to get the best results from your Camp Chef pellet grill.
Pellet Grill Preparation
Start by cleaning the grill grates. Remove any leftover ash from the firepot. Check the pellet hopper and fill it with fresh wood pellets. Use high-quality pellets for consistent heat and smoke. Make sure the drip tray is clean and in place to catch grease.
Temperature Settings
Set your Camp Chef to a low temperature between 225°F and 250°F. This range cooks the brisket slowly and evenly. It allows the meat to break down and become tender. Avoid opening the lid often to keep the heat steady. A stable temperature is crucial for great smoke flavor.
Smoke Selection
Choose wood pellets that complement beef. Hickory, oak, or mesquite are popular choices for brisket. They add a bold, smoky flavor without overpowering the meat. Avoid sweet woods like cherry or apple for this recipe. The right smoke enhances the brisket’s natural taste perfectly.

Credit: www.reddit.com
Smoking Process
The smoking process is the heart of a great Camp Chef brisket recipe. It transforms a simple cut of beef into tender, flavorful meat with a rich smoky taste. Patience and attention to detail during smoking make all the difference.
Temperature control and timing play key roles throughout the process. Each step builds on the last to create perfect brisket bark and juicy meat inside.
Initial Smoking Phase
Start by preheating your Camp Chef smoker to 225°F. Place the brisket fat side up on the grill grates. Smoke the meat slowly for several hours. This phase allows smoke to penetrate the meat deeply. Avoid opening the smoker often to keep heat steady. The goal is to build a flavorful bark and develop smoky aroma.
Monitoring Internal Temperature
Use a reliable meat thermometer to check the brisket’s internal temperature. Aim for 165°F before moving to the next step. This is where the meat hits the “stall,” slowing cooking as moisture evaporates. Keep the smoker temperature steady. Watching the temp helps prevent overcooking or drying out the brisket.
Using The Texas Crutch
Wrap the brisket tightly in foil or butcher paper once it hits 165°F. Add a splash of beef broth, apple juice, or tallow inside the wrap. This keeps the meat moist and speeds cooking. Return the wrapped brisket to the smoker. Wrap helps push through the stall and tenderizes the meat. Unwrap near the end to firm the bark before serving.
Wrapping Techniques
Wrapping is a key step in cooking a brisket on your Camp Chef grill. It helps the meat stay moist and tender during smoking. Wrapping also controls the cooking speed and bark texture. Choosing the right wrap and timing can change your brisket’s final taste and feel.
Let’s explore the best wrapping methods, adding moisture, and when to wrap for perfect results.
Foil Vs Butcher Paper
Foil creates a tight seal around the brisket. It traps steam and juices well. This makes the meat very tender but can soften the bark. Butcher paper lets the meat breathe more. It keeps the bark firmer and adds a smoky flavor. Both work well on a Camp Chef smoker. Pick foil for softer bark and more moisture. Choose butcher paper for a crisp bark and smoky taste.
Adding Moisture
Add liquid inside the wrap to keep the brisket juicy. Beef broth, apple juice, or tallow are popular choices. They help braise the meat and add flavor. Pour a small amount before wrapping. This stops the brisket from drying out during the stall. Moisture also helps break down connective tissue for tenderness.
Timing For Wrapping
Wrap the brisket once it reaches an internal temperature of about 150-165°F. This is when the stall starts, and the meat stops rising in temperature. Wrapping now speeds up cooking and locks in juices. Avoid wrapping too early, or the bark won’t form well. After wrapping, continue cooking until the brisket hits 200-205°F for perfect tenderness.

Credit: www.esseg.eu
Finishing The Brisket
Finishing the brisket is a critical step in this Camp Chef brisket recipe. It transforms the meat’s texture and flavor. After slow smoking and wrapping, the brisket needs careful handling to achieve perfect tenderness and taste.
This stage involves unwrapping, crisping the bark, adding sauces if desired, and checking the final temperature. Each step enhances the brisket’s quality, making it juicy and flavorful.
Unwrapping And Crisping Bark
Remove the brisket from the foil or butcher paper carefully. Place it back on the grill or smoker. Increase the heat slightly to around 275°F. This step helps to dry the surface and create a crispy, flavorful bark.
Keep an eye on the brisket to prevent burning. Crisping the bark usually takes 20 to 30 minutes. This process adds a pleasant texture contrast to the tender meat inside.
Saucing Options
Brisket can be sauced or served dry, depending on your taste. Classic barbecue sauce adds tang and sweetness. You can brush it on during the last 10 minutes of cooking.
Another option is to serve the brisket with sauce on the side. This lets each person control the amount. Choose sauces with smoky, sweet, or spicy flavors to complement the meat.
Final Temperature Check
Use a meat thermometer to check the brisket’s internal temperature. The ideal range is 195°F to 205°F. This ensures the meat is tender and fully cooked.
Insert the thermometer into the thickest part of the brisket. If it feels like soft butter and the temperature is right, the brisket is ready. Rest it for at least an hour before slicing to keep juices locked in.
Resting The Brisket
Resting the brisket is a vital step in the Camp Chef brisket recipe. After smoking, the meat holds a lot of hot juices inside. Resting allows these juices to redistribute evenly. This process makes the brisket tender and juicy. Skipping this step can cause the brisket to lose moisture when sliced.
Importance Of Resting
Resting helps the meat fibers relax. This stops juices from rushing out when cutting. The brisket becomes more flavorful and moist. It also makes slicing easier and cleaner. Resting gives time for the meat to reach even temperature inside. This improves the overall eating experience.
Resting Methods
Wrap the brisket tightly in foil or butcher paper. Add a bit of beef broth or apple juice for moisture. Place the wrapped brisket in a cooler or warm oven. Keep it covered with a towel to hold heat. Avoid leaving the brisket uncovered to prevent drying out. Some use a warming drawer or a warming box as well.
Duration Guidelines
Rest the brisket for at least 45 minutes. One to two hours is ideal for larger cuts. Longer resting times help deepen flavor and juiciness. Do not rest the brisket too long at room temperature. Keep it warm but not hot to avoid food safety issues. Use a thermometer to check the internal temperature if needed.
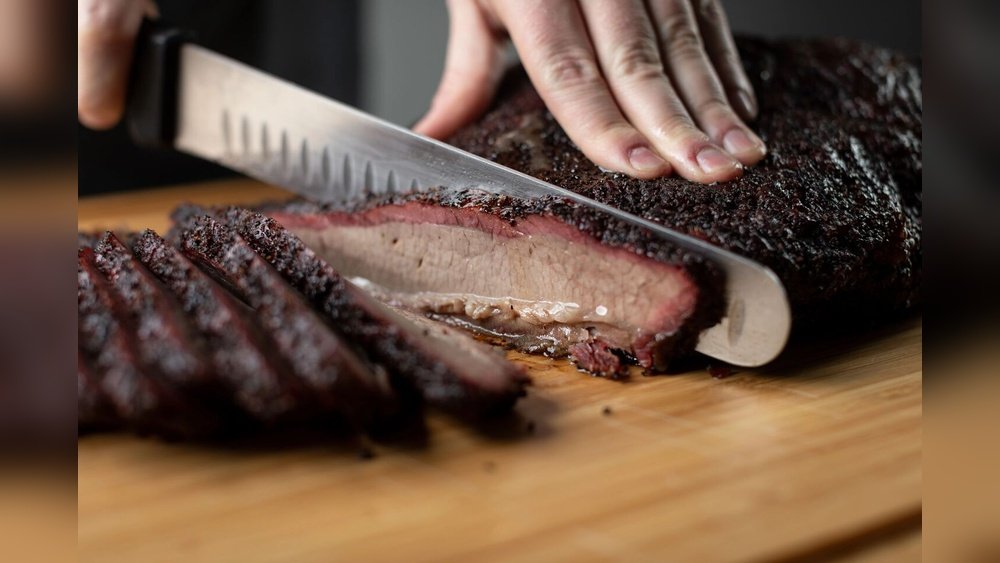
Slicing And Serving
Slicing and serving a Camp Chef brisket is an important step. It reveals the tender texture and rich flavor inside. Proper slicing preserves the meat’s juiciness and ensures an enjoyable eating experience.
Rest the brisket well before slicing. This helps the juices settle inside the meat. Use a sharp knife for clean cuts. Let’s explore how to separate the brisket parts, slice correctly, and serve it deliciously.
Separating Flat And Point
The brisket has two main parts: the flat and the point. The flat is leaner and thinner. The point is thicker and has more fat. To separate them, look for the fat layer between the two.
Use a knife to cut along the fat line carefully. Removing the point from the flat lets you slice each part properly. This also helps with serving different textures and flavors.
Slicing Direction
Slice the brisket against the grain for tenderness. The grain means the muscle fibers’ direction. Cutting against these fibers makes the meat easier to chew.
For the flat, slice thinly and evenly. The point can be sliced thicker due to its fat content. Keep the slices consistent for a better presentation and taste.
Serving Suggestions
Serve brisket slices warm with classic sides like coleslaw and baked beans. Add barbecue sauce on the side for extra flavor. Brisket also goes well with pickles and fresh bread.
Use the point slices for sandwiches or tacos. The flat works great on its own or with simple sides. Arrange the slices neatly on a platter for a stunning presentation.
Troubleshooting Tips
Troubleshooting your Camp Chef brisket can save the day and improve your results. Small mistakes happen often but fix easily. Knowing what to watch for helps avoid common problems and makes cooking smoother. This section offers practical tips to handle issues with cook times, moisture, and other frequent challenges. Use these tips to keep your brisket tender, juicy, and flavorful every time.
Common Pitfalls
One common pitfall is cooking at the wrong temperature. Too high heat can dry out the brisket. Too low heat may make it tough and chewy. Another mistake is not trimming the fat properly. Excess fat can cause flare-ups or uneven cooking. Skipping the rest period after cooking leads to dry meat. Finally, not wrapping the brisket during the stall phase can slow cooking and dry the meat.
Adjusting Cook Times
Cook times vary by brisket size and grill type. Larger briskets need more time at low heat. Smaller pieces cook faster but still need patience. Monitor the internal temperature closely. Aim for 195°F to 205°F for tender meat. If your brisket stalls, wrap it tightly in foil with a splash of liquid. This helps push through the stall and tenderizes the meat faster.
Maintaining Moisture
Moisture is key for juicy brisket. Spritz your meat every hour with apple juice or beef broth. Use a water pan in your smoker to keep humidity steady. Wrapping the brisket in foil or butcher paper traps steam and locks in moisture. Add a small amount of liquid like tallow or broth to the wrap. Let the brisket rest for at least an hour after cooking to let juices redistribute evenly.
Additional Tips
Adding a few extra tips can improve your Camp Chef brisket cooking experience. These suggestions help enhance flavor, control temperature, and guide beginners through the process. Small changes lead to better, tastier results every time.
Using Tallow For Flavor
Tallow adds rich, beefy flavor to your brisket. Use it in the foil wrap to keep the meat moist. It also helps tenderize the brisket during cooking. Simply melt some beef tallow and pour it over the brisket before wrapping. This step boosts juiciness and deepens the smoky taste.
Monitoring With Probes
Temperature probes are key for perfect brisket. Insert a probe into the thickest part of the meat. This helps track the internal temperature without opening the smoker. Keep the smoker’s temp steady for even cooking. Remove the brisket when it hits about 200°F for tender results. Probes prevent overcooking or drying out the meat.
Adapting Recipes For Beginners
Start with simple steps if you are new to brisket. Choose a basic rub and stick to the recommended cooking times. Use a reliable thermometer to check doneness. Avoid opening the smoker too often. Follow a clear recipe and take notes for next time. Practice makes perfect with Camp Chef brisket recipes.
Credit: www.campchef.com
Frequently Asked Questions
How Long Do You Cook A Brisket In A Camp Chef?
Cook brisket in a Camp Chef smoker at 225°F for 1 to 1. 5 hours per pound. Wrap it halfway through. Rest for at least one hour before slicing.
What Is The 3 2 1 Brisket Rule?
The 3-2-1 brisket rule cooks brisket in three stages: 3 hours unwrapped, 2 hours wrapped, and 1 hour resting. This method ensures tenderness and flavor.
What Is The 4 2 10 Rule Brisket?
The 4-2-10 rule brisket means smoking brisket 4 hours unwrapped, 2 hours wrapped, then resting 10 hours for tender, juicy meat.
How Long To Smoke A Brisket At 225 On A Pellet Grill?
Smoke a brisket at 225°F on a pellet grill for about 1 to 1. 5 hours per pound. Monitor internal temperature until it reaches 195-205°F for tenderness. Rest the brisket for at least one hour before slicing to retain juices and enhance flavor.
Conclusion
Camp Chef brisket brings rich flavors with simple steps. Patience and careful timing make tender, juicy meat. Wrapping keeps moisture in, creating a perfect bark. Rest your brisket well to keep it juicy and soft. This recipe fits well for any outdoor cookout or family meal.
Enjoy the smoky taste of Texas right at home. Try it today and savor a delicious, hearty brisket feast.
geminichef.com is a participant in the Amazon Services LLC Associates Program, an affiliate advertising program. As an Amazon Associate, we earn from qualifying purchases made through our links.